The Zebrabuzz e-commerce in Messenger chatbot is a unique attribute of Zebrabuzz, an online marketing software designed to help you start, grow, and promote your business.
Zebrabuzz is a marketing software that provides a chatbot capable of connecting your business with new and existing customers wherever they may be. It can help you generate leads and sales in real-time via web chat, SMS, and Facebook Messenger.
This special chatbot is designed to help you sell your products and services through Facebook Messenger. To activate the Zebrabuzz e-commerce in Messenger chatbot, you will need first to create a user-friendly and easy-to-create virtual store.
Immediately the virtual store has been built; the chatbot takes over your products and services marketing – you do not need to bother anymore as it will sell and market your products and services for you on your behalf.
You must first have a virtual store on e-commerce in Messenger before the chatbot can sell your products.
Creating a virtual store is easy and straightforward; you do not have to be a tech guru or I.T. expert. Afterwards, you navigate to the bot settings of the interface to set your chatbot so it can work with the virtual store.
How to Connect Your Facebook Account
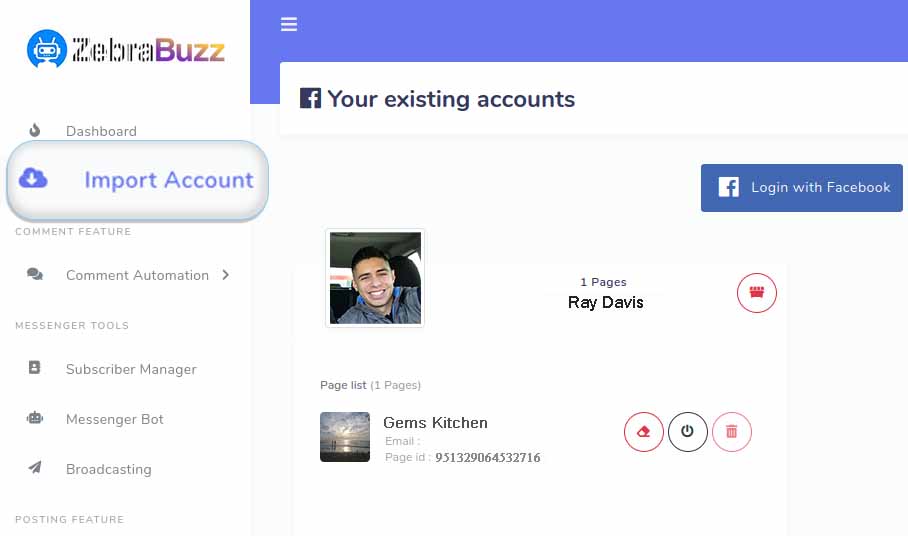
To import your Facebook account, the first step is to log into Zebrabuzz; you will land on Zebrabuzz’s Dashboard.
Navigate to the left panel of the Dashboard and select the “Import Account” tab, this will take you to the ‘Your Existing Accounts’ page.
You will find a ‘Login with Facebook’ option, click on it and use it to connect your Facebook Account to Zebrabuzz.
After you have successfully done this, your Facebook account alongside any other Facebook page you have will be available and listed on the Dashboard.
The platform also gives you room to add more than one Facebook account if you have multiple. It is a multiuser platform, so you are free to add as many accounts as you want.
To do this, follow the same steps you did in adding the first account. The ‘Login with Facebook’ option will still be available on the Dashboard.
How to Create a Virtual Store
Remember, you also need to create a virtual store to achieve this, navigate to the left-hand panel on the Dashboard where you will find an option named “Messenger Bot.”
After clicking the option, there will be details of all the features and functions of the Messenger bot. You can go through it to fully understand all the Bot offers your business.
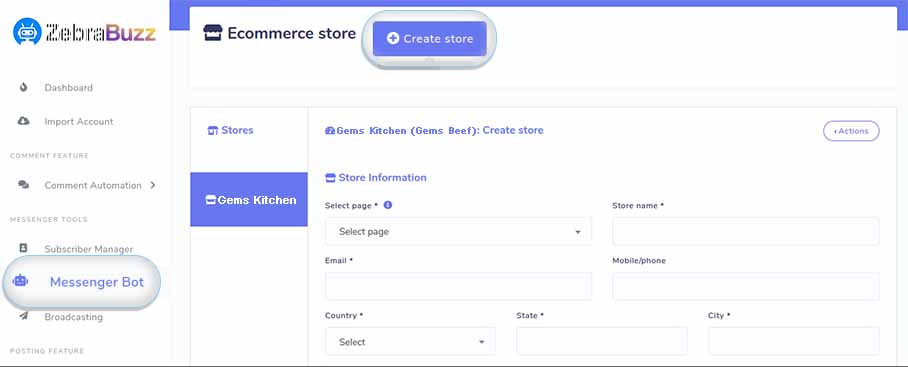
Once you are done, scroll downwards to the last part of the page to the ‘Messenger E-Commerce Store’ tab; it is at the bottom right of the page. Click on ‘Action’, and a prompt menu will show.
The menu has two tabs; ‘Stores’ and ‘Payment Accounts’. Select the latter, and an e-commerce form will appear.
Next, add your PayPal and Stripe account details to fill the form. In addition, you can as well give instructions for manual payment in the ‘Manual Payment Instructions’ box.
If you want to activate the ‘Payment Sandbox mode’, you can achieve this by clicking the radio button. Note, while creating your virtual store, you will only be able to enable the two payment options, which are PayPal and Stripe when you fill the form.
Click on the ‘Stores’ tab and an ‘E-commerce Store’ page will appear. Navigate to the top of the page and select ‘Create Store’ which will trigger a form called ‘Store Information’. Complete the form to end the first stage of creating your virtual store.
Afterwards, you will have to select your preferred Facebook page (if you have added more than one). Click on the ‘Select Page’ box on the page which will integrate your page with the Zebrabuzz’s e-commerce in Messenger chatbot.
Provide the name of your business or virtual store inside the ‘Store Name’ box as well as your contact information. The contact information includes email address, mobile number, your store’s location or address.
In the ‘Tax’ box, state your tax in percentage and provide shipping fees in the appropriate box. The next step is to authorise your checkout and payment options like PayPal, Stripe, Manual or/and Cash on Delivery checkout. Note the default checkout option is Cash on Delivery.
Next, upload your store’s logo or/and favicon and provide your Terms and agreement as well as refund policy. Note that it is possible to change your store’s availability status by checking the radio button labelled ‘Online’ to toggle in-between your online and offline status.
You can also choose to activate a confirmation message feature which means your customers will receive a message after completing their checkout. You can find this in the ‘Confirmation Message’ option.
The confirmation message is basically for confirming the order a customer has made. The details in the message should include the number of products ordered, the price of each of the products as well as the total amount, the payment method used, and the delivery address.
This confirmation can be sent to your customers via SMS as well as their emails.
You will have the opportunity to fill all these details in at their appropriate boxes. There is also the option of enabling a button called ‘My Orders’ which will help your customers see their orders, both pending, completed, and past.
There is a default message in the ‘Messenger Content’ box, but you can choose to rewrite it to your preference.
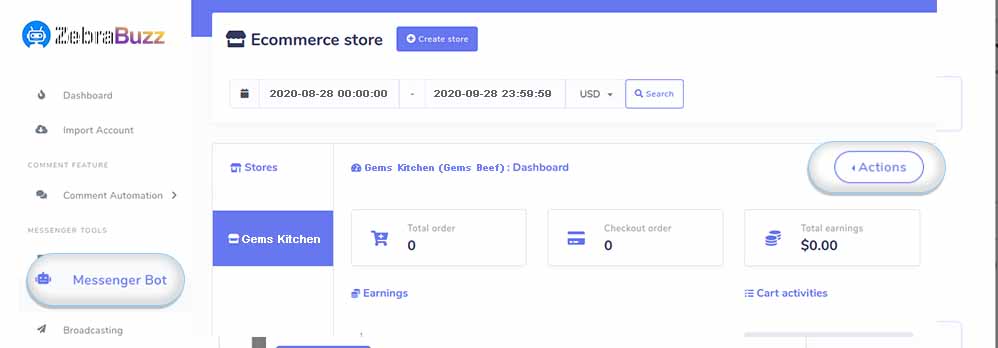
Now, select the ‘Create Store’ button to complete your virtual store creation. Your store will be placed on the ‘Stores’ menu with all the details you have provided.
The landing page will be your Dashboard, and you can find all your orders, earnings on the page.
You can create a new store by navigating to the ‘Create Store’ button which is at the top of the same page. Follow the steps you did in creating the first, and you have the freedom to create as many as possible.
How to Organise your Store
After you have completed the creation of your store, you can now organise the store and dictate the layout.
Starting from the right-hand side of the page labelled ‘E-commerce Store’, click on the ‘Action’. A menu of Dashboard, Coupon, Products, Categories, Orders, and Attributes will appear.
The menu also provides options like the chance to copy your store’s URL, Delete Store, Edit Store, Visit Store etc.
How to Add Categories to your Store
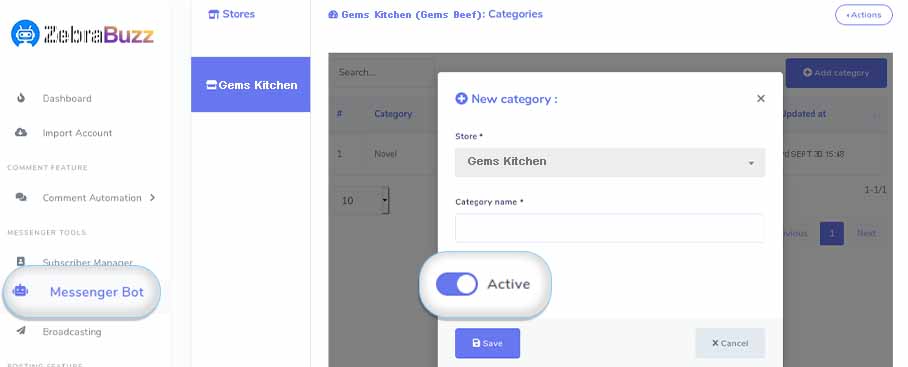
As stated in the options provided in the ‘Action’ tab, you can divide your store into categories. The first and obvious step is to select the ‘Categories’ option to add a new category for your products and services.
Click on ‘Add Category’ and fill out the ‘New Category’ box which will pop up afterwards. Remember to click ‘Save’ to effect the changes.
After saving, your category will be stored on your business page. It is possible to edit the category or delete it later on using the ‘edit’ or ‘delete’ button.
You can add as many categories as possible to suit your specifications and can also make a specific category inactive if you do not want to edit it or delete it. This can be achieved by toggling the ‘Active’ button.
How to Add Attributes to Your Products
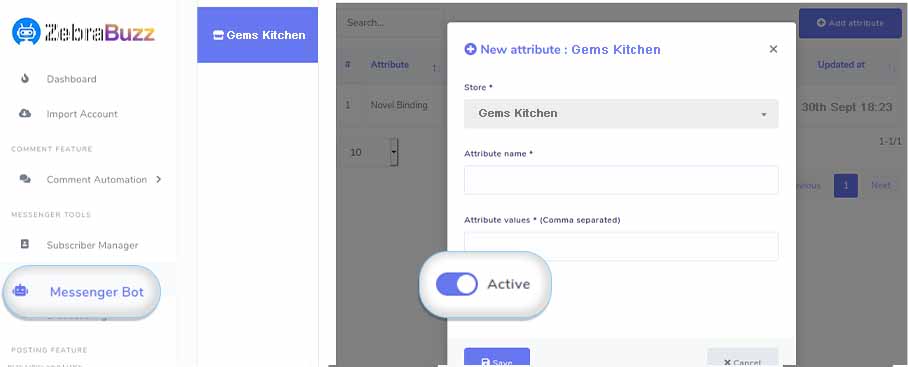
Adding attributes to your products is similar to categorising them. After clicking on the ‘Attributes’ button, click on the ‘Add attribute’ page that appears.
Follow up with the prompt called ‘New Attribute’ and input the attribute in the box called ‘Attribute name’. You can add the values of the attribute under the ‘Attribute Values’. Click ‘Save’ to effect the changes.
You can also edit and delete attributes just like categories. There is the option of adding as many attributes as possible for your products.
How to Add Products to your Shop
When you have your categories and attributes set up, you can proceed to add products to your store.
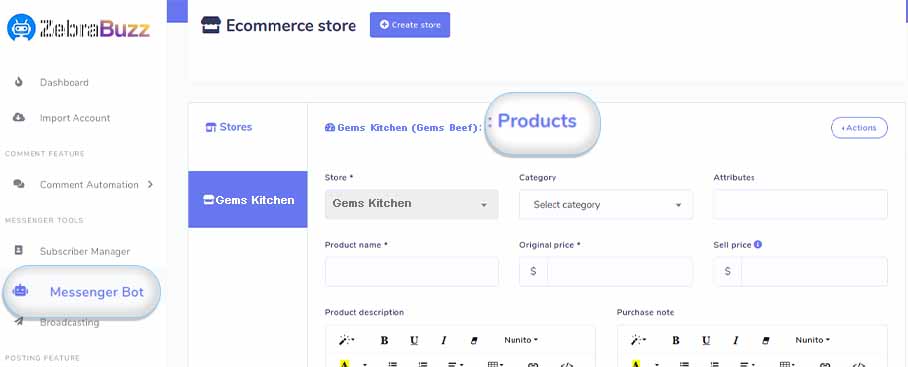
To do this, click on the ‘Products’ menu which will take you to the Products page. Click ‘Add Product’ and fill out the form that pops up; this will include the product details.
In the ‘Store’ box will be the name of your store, if you have more than one, select the store you prefer to add the products in.
Next is to select a category from the categories you have added. The next step is to add an attribute from the ‘Attribute Box’ just like the category.
The box called ‘Product Name’ will hold the name of your product and then write the original and selling price in the appropriate boxes.
The next step is to add a product description to the ‘Product Description’ box. Now, you can add the thumbnail and featured image of your product.
Afterwards, you can fill in the ‘Items in Stock’ box to show the number of that specific product you have available.
There are three options which you can either activate or deactivate based on your preferences. These are:
Display Stock
Prevent Purchase if out of Stock
Status and Taxable
The ‘display stock’ will enable customers to see the number of products available. The ‘prevent purchase if out of stock’ button means customers can’t buy a product once it has finished.
‘Status’ if off, means your customers can’t see the product while they buy from your shop while ‘taxable’ when activated means tax is automatically added to the product price.
Click ‘Save’ to effect the changes. You can add as many products as you want, simply follow the steps above for each of them.
How to Enable the Zebrabuzz E-Commerce in Messenger Chatbot
To activate the e-commerce Messenger chatbot, the first step is to navigate to the ‘Messenger Bot’ page.
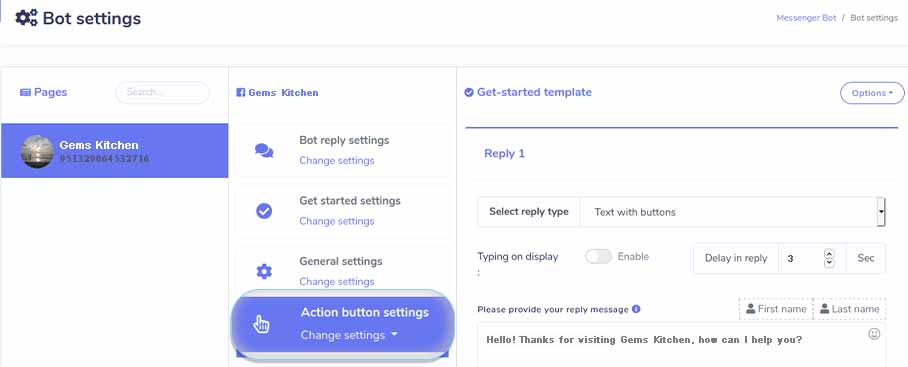
At the ‘Bot Settings’ tab, you will find the ‘Action’ button; click it, and the settings interface will popup.
Next, click on ‘Change Settings’ under ‘Action button Settings’, a menu will subsequently appear.
Select ‘Get Started Template’; this will show on the right-hand side of your page. Navigate to ‘Select Reply Type’ and click the right side of the box to access a menu.
Choose the ‘Text with Button’ option. Typing on display can be enabled on the radio button. The ‘Delay in Reply’ is to set the time in seconds.
You can also write an automatic greeting message to your customers which will be sent by your e-commerce in Messenger chatbot immediately after they send a message.
If you want the first name or the last name of the customer to show, select the respective options at the top of the box.
Right below the message box are three boxes labelled ‘Button Text’, ‘Button Type’. Button Text allows you to write the name of the button, for example, ‘Buy Now’.
Selecting ‘Button Type’ will bring a menu that you can select a different kind of buttons from. The list is where you will choose the button you wish to use. You are free to choose any button you want.
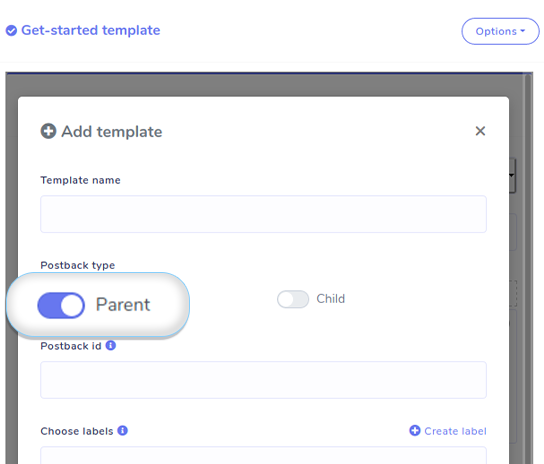
Creating a ‘Post Back’ Button
A postback button can be created by selecting ‘Post Back’ from the ‘Button Type’ menu. Afterwards, click ‘Add’ which is below the ‘Postback ID’ box. Write the name of the template in the ‘Template Name’ under the ‘Add Template’ tab.
Fill in the postback I.D. in the ‘Post Back ID’ box. From the box labelled ‘Select Reply Type’, choose ‘Carousel’. You have the option to activate ‘Typing on Display’ if you check the radio button.
The ‘Delay in Reply’ is to set the time in seconds. You can also write a message for your customers which will be automatically sent as soon as they click the postback button of your Messenger bot.
The ‘First Name’ and ‘Last Name’ options give you the option of including your customers’ names if you check them.
After selecting the ‘Carousel’ template, you can upload product images by clicking on the ‘Upload’ button. The image destination link that comes after is optional; you can keep it blank.
Fill in the title and subtitle of the carousel, and write the button’s name in the ‘Button Text’ option.
If you want to add your store’s URL, select “Webview (Full)’ from the same ‘Button Type’ menu. Choose a product you are creating the postback for and copy and paste into the ‘Web URL’ box.
You can add more templates the same way you have created these. Click on ‘Close and refresh list’ to return to the ‘Bot Settings’ page.