Social media platforms like Facebook Messenger are one of the best places to reach your customers. There are billions of people on there, and the possibilities for your brand are endless.
As Facebook Messenger is one of the best places you can engage with new and existing customers, it poses a great opportunity for your business.
However, either as a brand or for personal reasons, there is a need to send broadcast messages to either all of your contacts or a section of them on Facebook Messenger.
You don’t have to send a message to each of them one at a time because this can be burdensome and you will end up getting discouraged.
With Zebrabuzz, you can automate the way you send broadcasts on Facebook Messenger. This tool can be used to send private messages to a selected number of subscribers or bulk messages to all without the need for supervision.
There is also the assurance of getting up to 95% open rates on your Zebrabuzz Facebook Messenger broadcasts as well as click-through-rates of up to 75%!
This blog will show you can send broadcast messages on Facebook Messenger with Zebrabuzz. You can either send to all of your subscribers or choose the ones you want to send the message to.
How to Send Broadcast Messages on Facebook Messenger with Zebrabuzz
Step 1: To get started, log in to your Zebrabuzz dashboard. If you have not linked your Facebook page to your Zebrabuzz account, click on ‘Import Account’ at the top of the page and follow the easy steps that will be displayed.
You can also read our blog on how to create e-commerce in Messenger store to learn the step-by-step process on importing your Facebook page.
Step 2: To create your broadcast messages for Facebook Messenger, click on Broadcasting on your dashboard’s left menu.
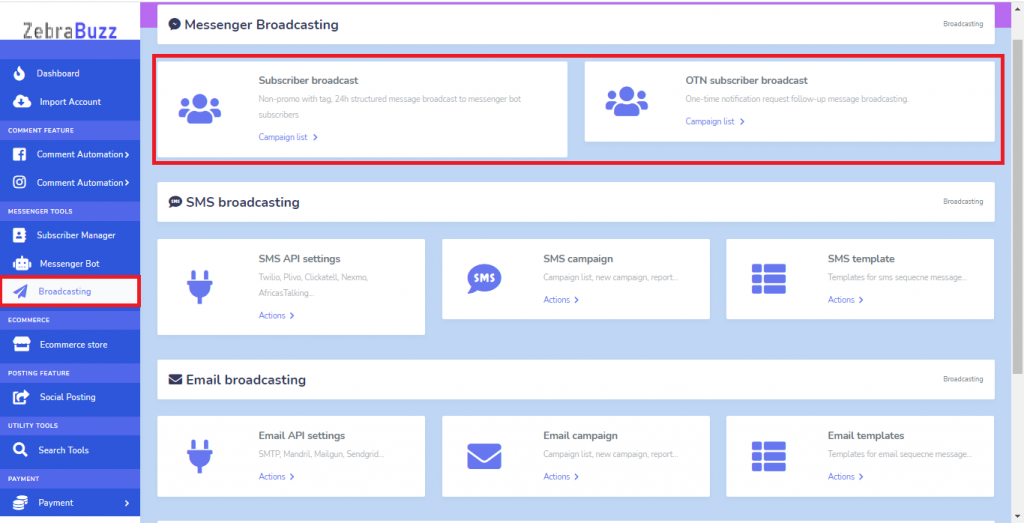
A new interface will be displayed. There are headings named Messenger Broadcasting, SMS Broadcasting, Email Broadcasting, and SMS/Email Sequence Campaigner for external contacts.
Besides Facebook Messenger, you can also use Zebrabuzz to send broadcast messages to your subscribers via their emails or SMS.
Two types of broadcasts can be sent on Messenger; the Subscriber Broadcast and the One-Time Notification (OTN) Subscriber Broadcast.
Subscriber Broadcast
Click ‘Campaign List’ under Subscriber Broadcast to continue.
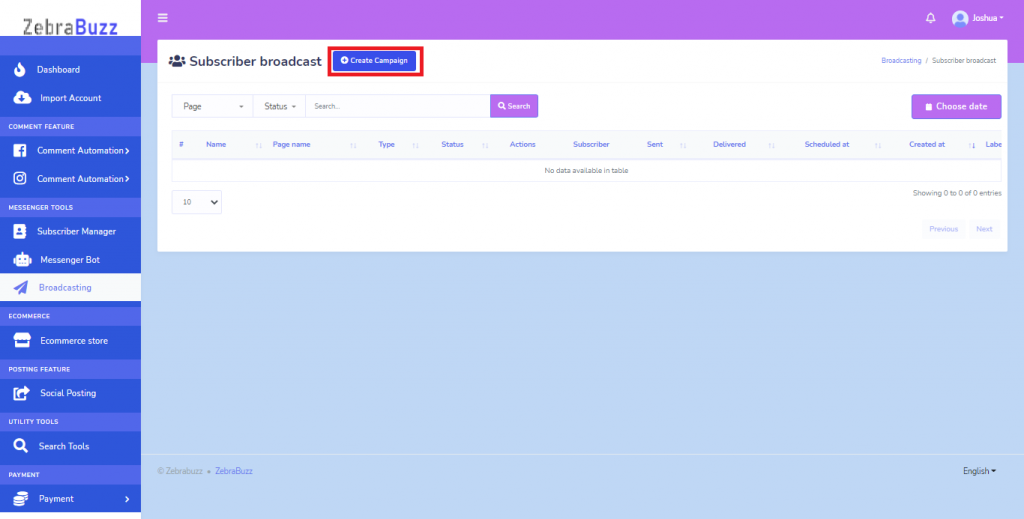
Step 3: On the new interface, click on Create Campaign at the top of the screen.
A new interface titled Add Subscriber Broadcast
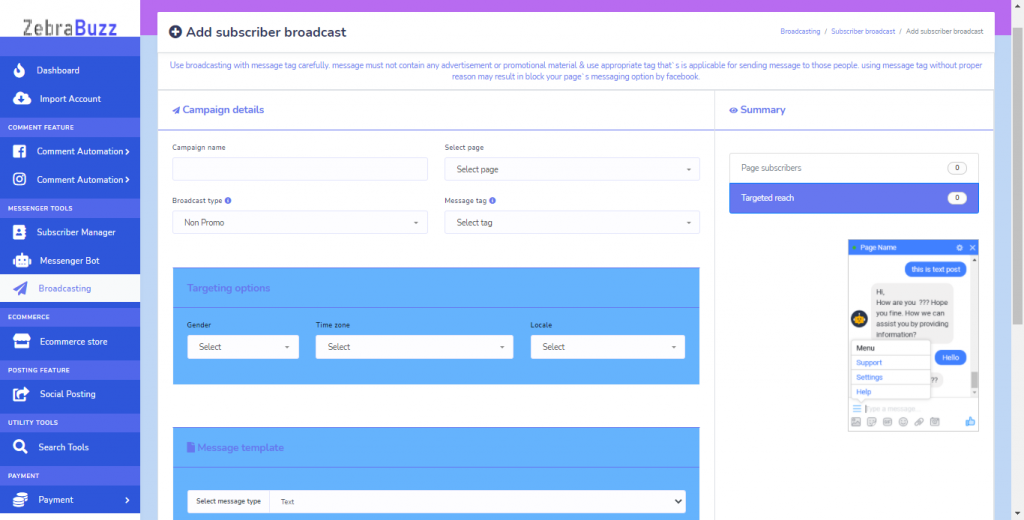
On this interface, you will see different boxes that you will fill to create your subscribers. The campaign name is so you can identify each broadcast you send.
You will also select the page, especially if you have more than one Facebook page imported into your Zebrabuzz account.
Step 4: Next, select the type of broadcast you want to send. You can choose between a Non-Promo broadcast and 24hour Promo. For the latter, there is a 24-hour policy.
Pages are permitted to send a promotional message to subscribers that have sent a message to your page in the last 24 hours.
The 24-hour limit is refreshed each time a person responds to a business through one of the eligible actions listed in the Messenger conversation entry points.
Next is to select the message tag. Ensure the broadcast message you are sending to your Facebook Messenger contacts are in tandem with whichever tag you select.
Please click the information icon (i) beside ‘Message Tag’ to see a full detail of the kind of message you are allowed to send based on each tag. You can also find more details on message tag at the top of this screen.
Step 5: Suppose you want to target a specific group of subscribers, Zebrabuzz also offers you targeting options. These options include Gender, Time Zone and Locale.
Step 6: Now, move to the Message Template part. You can select the type of message you want to send here.
For text, all you need do is provide the message. For image, audio, video, gif and file, you will have to upload from your local drive. Uploading is optional for Generic Template and carousel.
For Quick reply and Text with Buttons, you can provide a message text which is usually an instruction to click the buttons you have created.
Zebrabuzz allows you to mention the name of each subscriber in each message. You can use this to give a personal touch to your customers. It is used to give the customer the impression that the message was constructed for them only.
Step 7: By toggling the Sending Time radio, you will be able to choose the time when you want the broadcast message to be sent.
Step 8: Confirm the operation by clicking Create Campaign.
You can create as many different campaigns as possible and have it run for as long as you want without supervision. Your Zebrabuzz tool will continually send the broadcast messages to your Facebook Messenger subscribers without interruption.
One-Time Notification (OTN) Subscriber Broadcast
This type of broadcast also follows the same procedure as the first. However, there are a few things you should note.
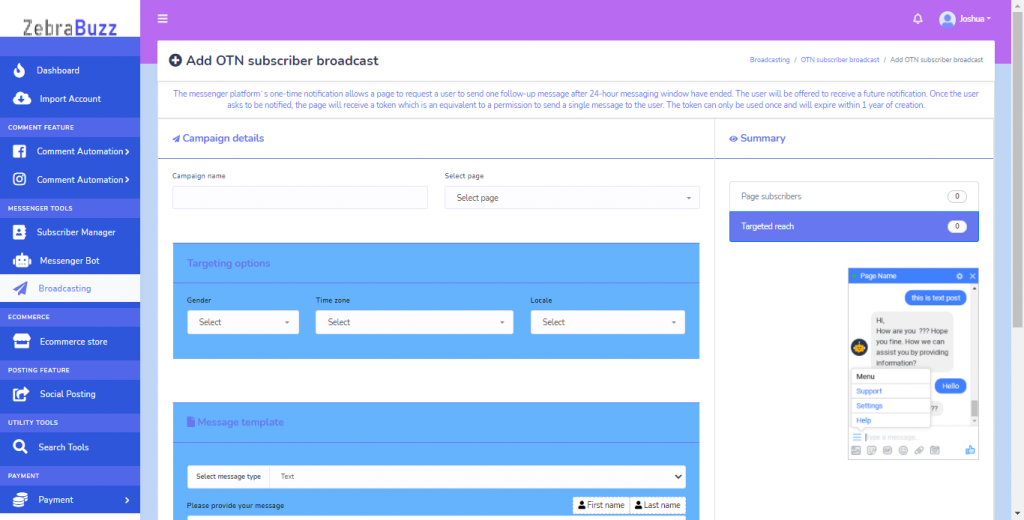
The Messenger platform’s one-time notification allows a page to request a user to send one follow-up message after the 24-hour messaging window has ended.
The user will be offered to receive a future notification. Once the user asks to be notified, the page will receive a token equivalent to a permission to send a single message to the user.
By following these steps, you will automate how you send broadcast messages on Facebook Messenger. You can set it to run for up to a year or more depending on your instructions. It will continually send the broadcasts at the appropriate time without interruption or supervision, giving you more room to focus on other equally important aspects.


