Zebrabuzz’s ‘Comment Automation’ is a unique feature among many other features that allows you to automate the comments on your Facebook and Instagram pages.
This feature has several functionalities that enhance the way you react to comments by your users. These functions include automatic replies to comments on your page, deleting a comment or more from your page as well as hiding it.
Zebrabuzz’s Comment Automation feature can also like and share the comments on your page, send private responses to the commenters. Indeed it can take total control of interacting with your customers without supervision.
This feature can make various types of replies like text, image, audio, video, quick reply, generic template, one-time notification, media, carousel, file, and text with buttons.
It is also very easy to use, and by following the steps below, you will be able to use Zebrabuzz’s Comment Automation feature.
Steps to Use Zebrabuzz’s Unique Comment Automation Feature
The first step to using Zebrabuzz’s comment automation feature is to integrate a Facebook account into your dashboard by using the ‘Import Account’ button.
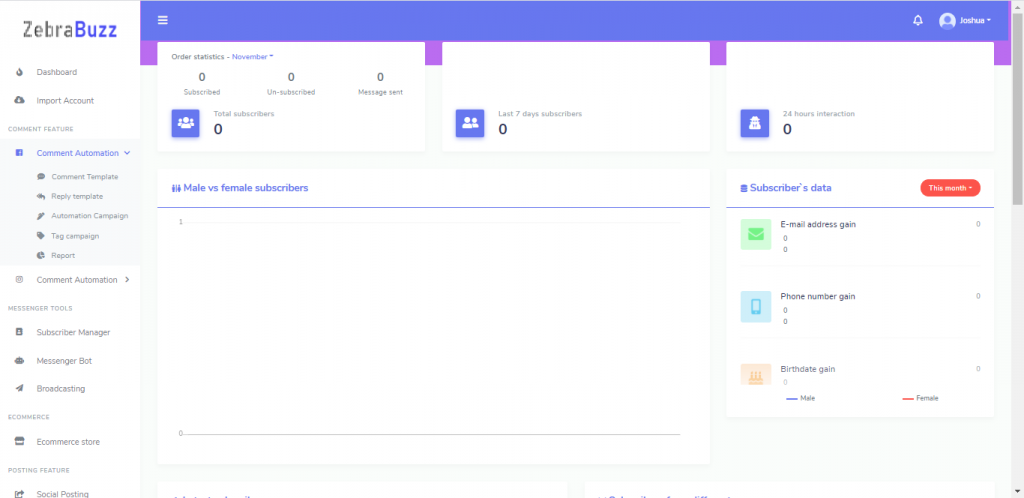
At the left-hand side of the dashboard, you will see the Facebook and Instagram Comment Automation tab.
Next, navigate to the Facebook Comment Automation option, and a drop-down sub-menu will appear when you click on it. This sub-menu has options like ‘Comment Template,’ Reply Template’, ‘Automation Campaign’, ‘Tag Campaign’, and ‘Report’.
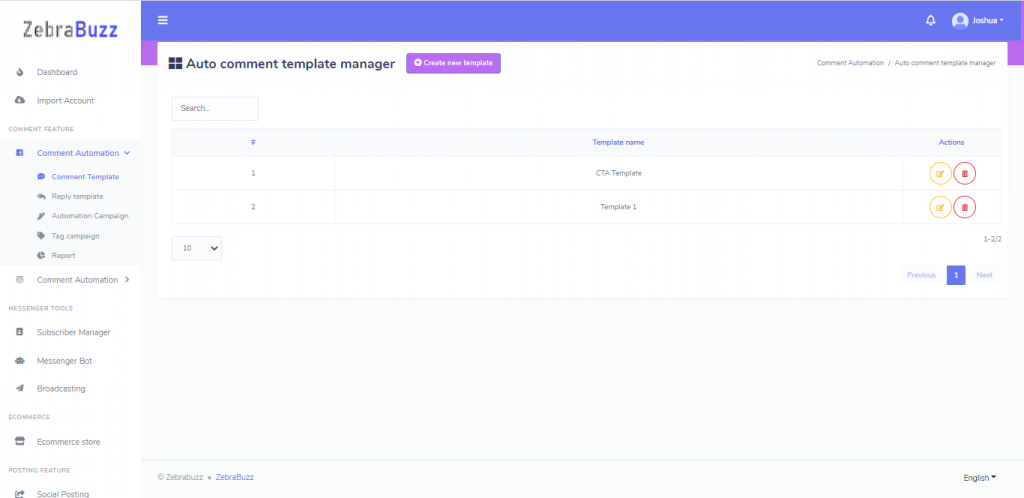
Choose the ‘Comment Template’ option, and you will be taken to a page labelled ‘Auto Comment Template Manager.’
Click the ‘Create New Template’ button beside the page name, which is at the top of the page. Fill the form that appears.
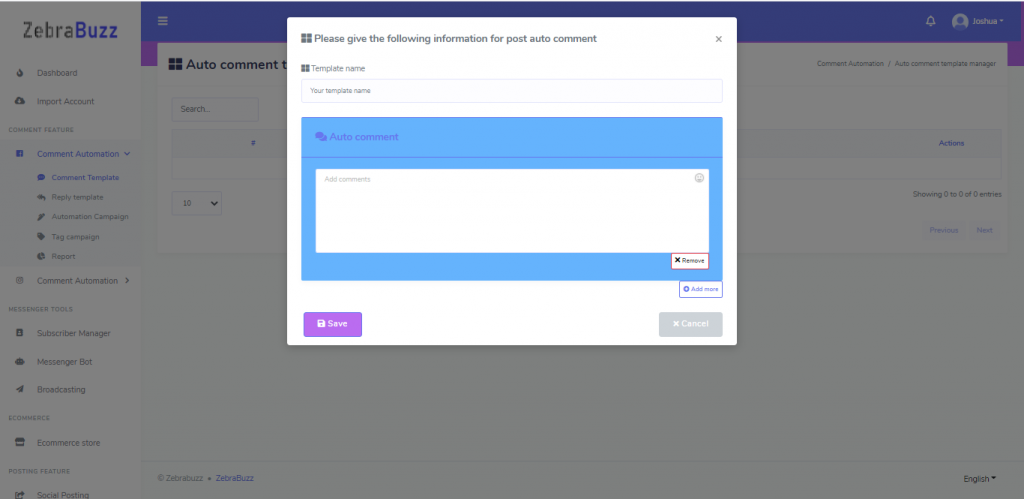
Fill out the name of the template in the ‘Template Name’ box and use the ‘Auto Comment’ box to write a comment. This comment is what will be automatically sent as a reply under the posts on your Facebook page.
You can fill in as many comments as possible with the ‘Add More’ button. Confirm the operation by clicking ‘Save’.
As soon as the template is created, it will appear on the ‘Auto Comment Template Manager’ page. You can also edit and delete each template with the respective icons beside them.
If you want to create more templates, use the ‘Create New Template’ button to create as many as you wish.
When you are satisfied with the number of templates you have, navigate to the ‘Comment Automation’ tab and click ‘Automation Campaign.’ Your ‘Create Campaign’ page should look similar to this:
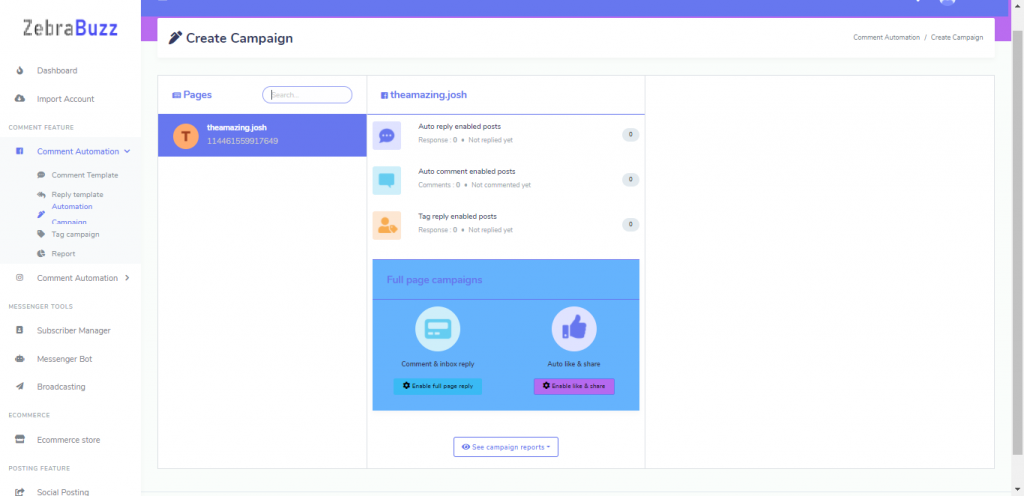
The list of all your Facebook pages will be at the left side of the page; select the page the campaign is meant for.
The name of the selected Facebook page will appear in the middle of the screen. Under it, you will find the total number of ‘Auto Reply Enabled Posts,’ ‘Auto Comment Enabled Posts,’ and the ‘Tag Reply Enabled Posts.’ These tabs are for you to see the total number of posts you have automated to have automatic replies, automatic comments, and tag reply.
There are two options below these tabs – ‘Comment and Inbox Reply’ option and the ‘Auto Like and Share’ option.
Click ‘Enable Full Page Reply’ to allow replies for a full page. A form will pop up immediately you do this.
The form should look like this:
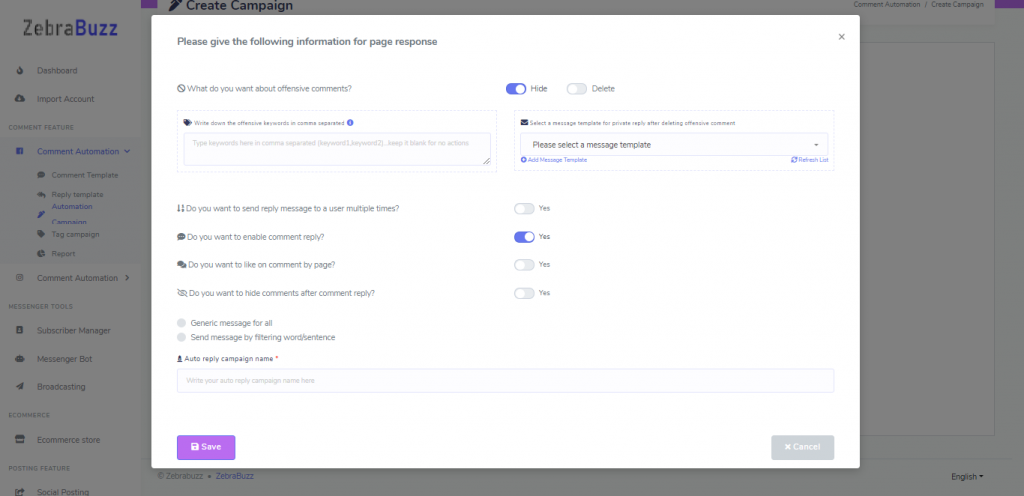
This form gives you the option to hide or delete comments on your page through the ‘Hide’ or ‘Delete’ options.
You can also write keywords that you consider to be offensive. When this feature spots a word like this on your page, it automatically deletes or hides it depending on your settings. Remember to separate offensive words with the comma.
Next is to add a message template for private replies after offensive comments are deleted.
Click on ‘Add Message Template’ if you have not previously created a template message. A form for you to fill appears.
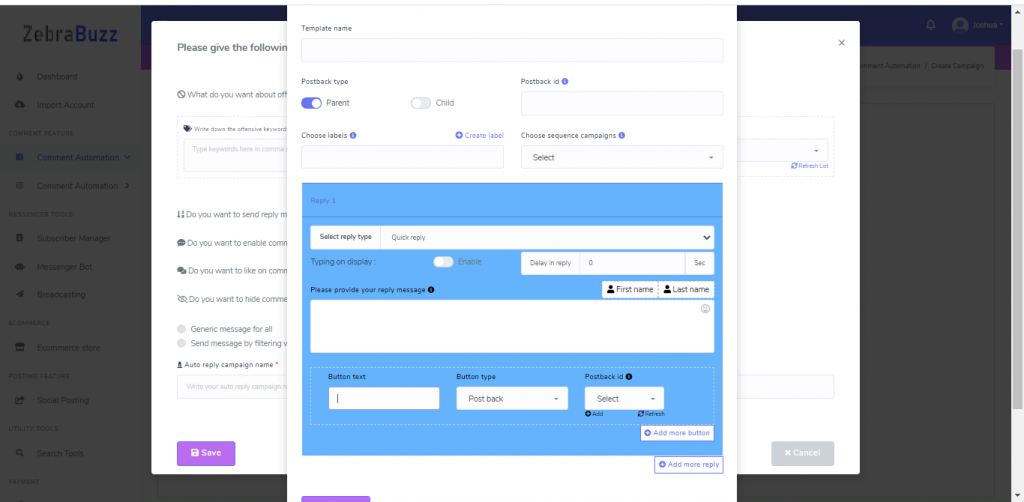
Write the name of the template in the appropriate box. Use the ‘Parent’ button to write the name of a ‘Postback ID’ in the ‘Postback ID’ box.
Levels are optional but if you want to add one, click on the ‘Create Level’ option and write the Level name and click the ‘New Level’ button to confirm.
Afterwards, use the ‘Choose Sequence Campaign’ box to choose the sequence campaign. This is optional as well, and you can decide to fill it or keep it blank.
Move to the Reply section where you will select ‘Reply Type’ and choose the kind of reply you want. The options include Text, Image, Video, Audio, Quick Reply, File, Text with Buttons, Carousel, media, Generic Template, and One Time Notifications. You can then allow typing on display and set the reply delay time.
If the reply time is a text, you will write the text in the message box. There are two icons above the box; ‘First Name’ and ‘Second Name’. These options, when you click them, means your message can include either the commenter’s first or second name.
It is also possible to add more replies by using the ‘Add More Reply’ option. For image replies, you will upload a message; the same thing goes for video or file replies.
For a quick reply, you will write the reply in the ‘Message’ box and the button name in the ‘Button Text’ box. You can then choose the button type from options like the user’s phone number or birth date, and postback.
If you choose postback, you will be asked for a postback ID, and if you haven’t created one, you can do so clicking the ‘add’ button which is under the box. A form labelled ‘Add Template’ will come up.
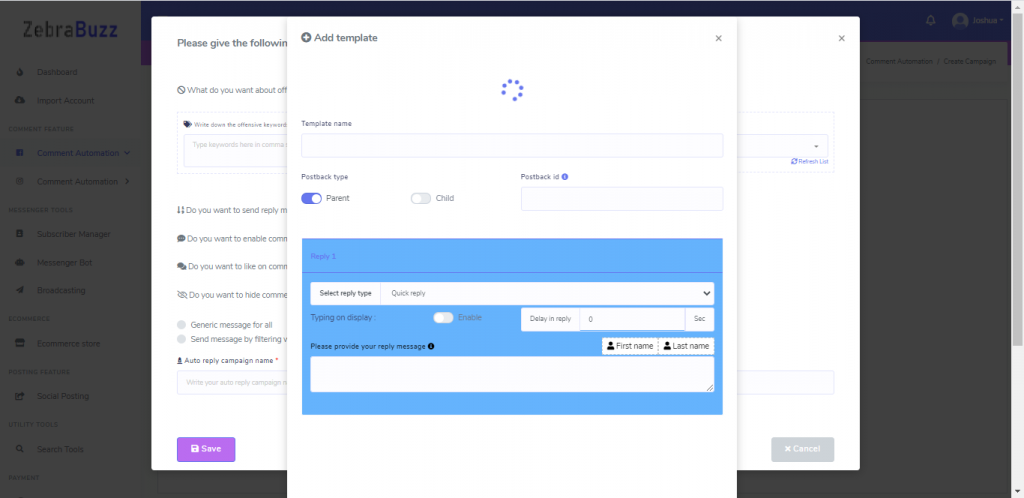
It works just the same way you created a message template. The template name works as the Postback ID so when you fill the ‘Template Name’ box; it appears in the Postback ID box.
Levels are optional, but you can choose to select level regardless. The same applies to the Sequence message.
Select a reply type; we will explain with text in this blog. Write a text in the Message box. You can add emojis if you want. Click ‘Submit’, and a pop-up confirmation message will be displayed. Click Ok and then ‘Close and Refresh’ button to confirm the operation.
When you return to the first form, you will see a message template has already been selected; you can then select or deselect options as you desire.
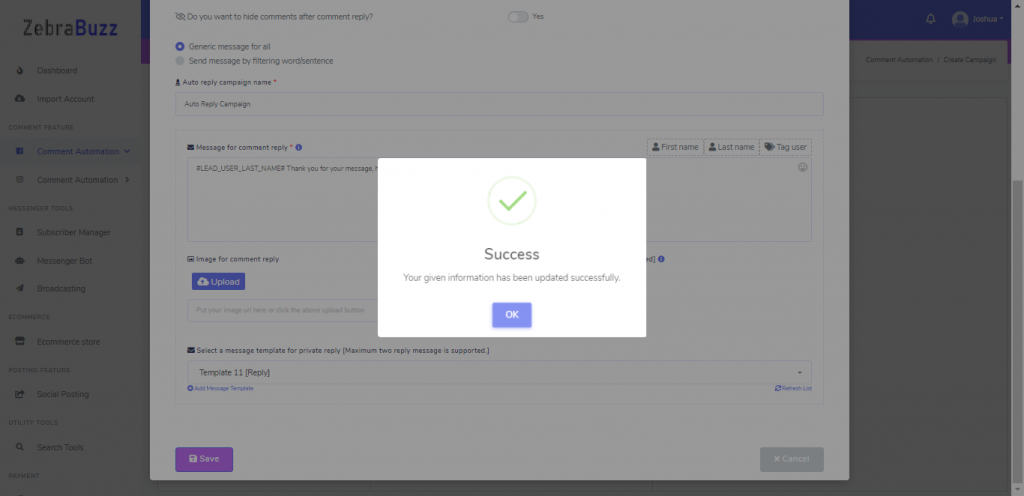
Proceed to write the name of an auto-reply campaign in the appropriate box, write a comment reply message (you can either tag them or use their first or last name to mention them).
If you are using an image or video as a reply, you will have to upload it. Select a message template for the private reply and click save. You should get a success message.
You will be taken back to the first page.
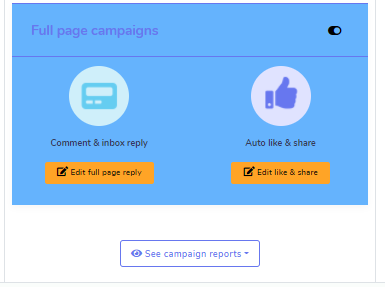
Next is the auto like and share button. To use this option, click the button to edit and fill out the form by enabling ‘Auto Share this Post’ and selecting a page from the list of pages in the ‘Auto Share as Pages’ box.
Select the delay time in seconds and enable ‘Auto Like this Post by Other Pages.’ Select a page from the auto like as pages’ box and click on save. A success confirmation message will appear.
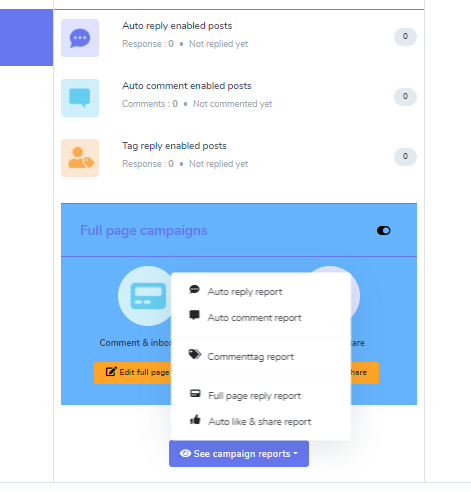
Click ‘See Campaign Reports’ to see Zebrabuzz’s Comment Automation report in different parts. A drop-down menu with options like ‘Auto Reply Report,’ ‘Auto Comment Report,’ ‘Commenting Report,’ ‘Full Page Reply Report,’ ‘Auto Like & Share Report.’ Clicking any of them will display the respective reports for each.
Each of your campaigns has an action button that allows you to perform certain functions. The panel on the right in the ‘Create Campaign’ page allows you to view the latest posts of whichever page you select.
Click on the ‘gear’ button of a specific post to enable Zebrabuzz’s comment automation feature for the post.
A drop-down menu will appear from the above operation; the options are ‘Enable Auto Reply,’ ‘Enable Auto Comment,’ ‘Enable and Fetch Auto Commenter,’ and ‘Leave a Comment Now.’
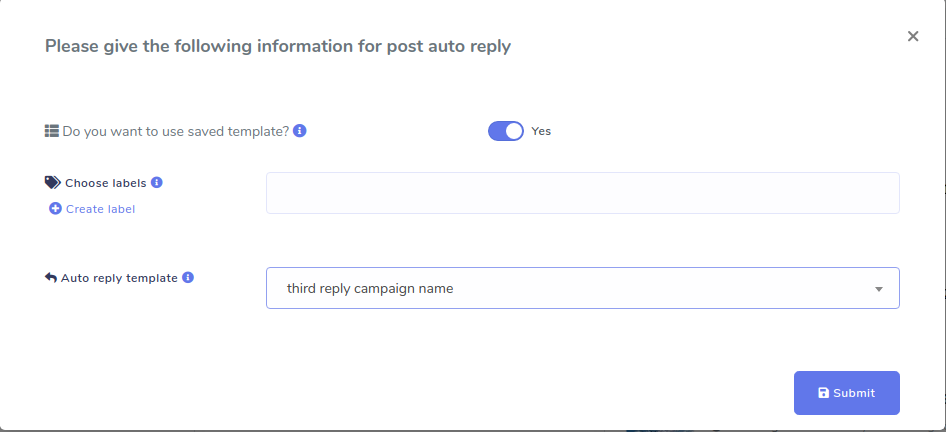
Use the first option to enable automatic reply for the specific post. This will bring up a form to be filed. Select ‘Yes’ to use a saved template. If you need to create a template, deselect ‘Yes’ and a form will appear for you to do so. Submit and save the template.
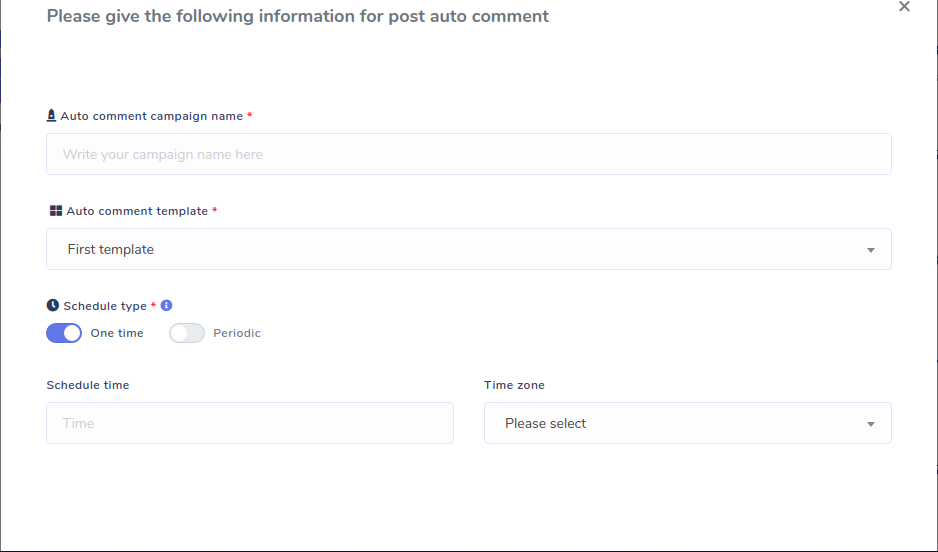
The ‘Enable Auto Comment’ option and fill the form as well then select the auto comment template from the box after writing the auto campaign name in the box. If you need to create a template, use the previous knowledge in this blog to do so.

Next is to click the ‘Auto Comment Template’ box to see the template that was just created. Select the template and set the ‘Schedule Time.’
If you choose ‘One time,’ a calendar will appear where you can pick a date and time as well as the time zone. Click ‘Save’ to confirm. For periodic, you will have to input additional information.
The ‘Enable and Fetch Commenter’ option will enable tag when clicked. A confirmation message will be displayed. In the message, there will be an option to click ‘Here’ to create a campaign. Click it, and a ‘Create Campaign’ page appears.
Click on the ‘Leave a comment Now’ option in the Campaign report and fill the form that appears.
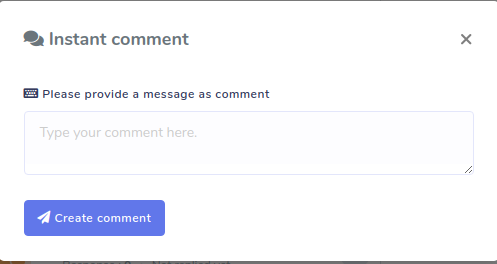
Write the message which will be the comment and click the ‘Create Campaign’ button. A success message will appear, and you will be able to see the comment under that specific post.
Click on ‘See Campaign Reports’, and a drop-down menu appears. Each report option will take you to a page where you will be able to see the detailed reports on that option. You can as well edit, start, pause, and delete a campaign, and if you click on the post ID, it will direct you to the post.
By following these steps, you will be able to use Zebrabuzz’s unique Comment Automation feature.