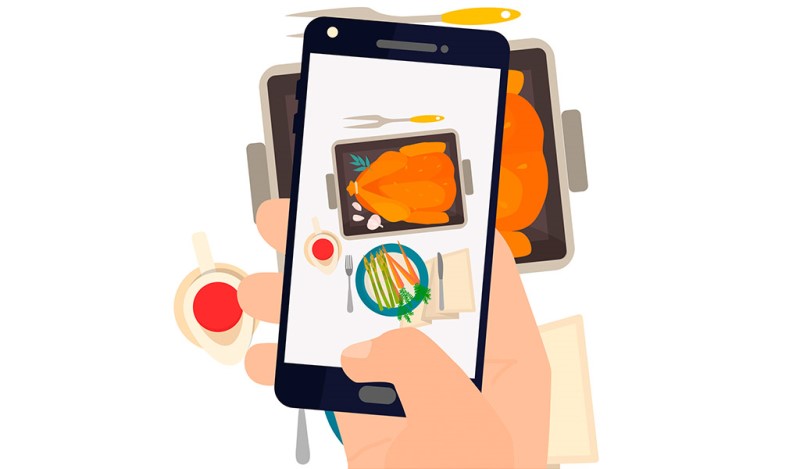
The food industry is one place where automation is very necessary. When it comes down to food, a lot of people can lose patience in seconds.
Automation in this industry requires a food ordering chatbot that will make the experience of customers seamless and fast.
Therefore, due to increasing demands from customers, more expectations and need to pull ahead of fierce competition in this industry, food ordering chatbots are very important.
To create a food ordering chatbot has become very easy. You do not need any knowledge about programming as Zebrabuzz allows you to create your chatbot in simple, straightforward steps.
Zebrabuzz has features that enable you to create a food ordering chatbot that can be personalised to the functions and operations of your restaurant.
Also, as chatbots are conversational tools, one of the best places to integrate them is on instant messaging platforms like Facebook Messenger and the likes.
This special chatbot is designed to help you sell your products and services through Facebook Messenger.
This ensures the billions of users that use this platform can order food even when working or chatting with friends and family.
Before you create a food ordering chatbot, let us first walk through the process of creating products and attributes on your store which will be needed for your chatbot.
To create a store, simply use the ‘e-commerce store’ option on the left and use the ‘create store option’ at the top to do that. More details on creating a store can be found here.
You can skip down if you have already set up your store with all the products, attributes, payment settings and the likes.
If you haven’t edited your store options, read below:
How to Edit Store Options
Now, at the right side of your store, you will see several options listed where you can create and edit settings like changing your store settings, setting up payment integration settings, creating QR Menu, and so on.
The ‘Store settings’ is where you can edit the store. If you forgot to add something when creating or added something you want to remove, you can edit it here.
‘Checkout Settings’ is where you edit your payment settings. After your customers order food, they can also pay for the food instantly.
Zebrabuzz integrates up to 6 payment methods including PayPal, PayStack, RazorPay, Mollie, Stripe, Manual Payment, and payment on delivery.
When your customers order, they can pay online before you deliver the food or choose payment on delivery if your restaurant allows such option.
After your customers order food, they can also pay for the food instantly. Zebrabuzz integrates up to 6 payment methods including PayPal, PayStack, RazorPay, Mollie, Stripe, Manual Payment, and payment on delivery.
When you click on the option, you will see a form that allows you to fill in your payment settings details as well as the payment settings you want to integrate into the checkout.
For detailed information as to how to set your restaurant’s payment settings, read the blog on it here. When your customers order, they can pay online before you deliver the food or choose payment on delivery if your restaurant allows such option.

QR Menu
The next option is the QR Menu. You can generate a QR Menu from here. You can change the colour, edit the welcome message, and so on.
There are two QR codes available; the first is the Messenger QR code and the second, the direct code under the ‘outside QR code’ tab.
You will learn more about how this works at the end of this blog.
Categories
Next, navigate to categories; this is where you can add different categories to your store for customers to choose from.
The categories will be based on what you sell, e.g. Burger, Pizza, Chicken, Rice, etc.
To create a category, click on ‘Add Category’ at the top right corner of the screen and write the name of the category. Click ‘Save’ to confirm.
Attributes
Next, go to the attributes option where you will be able to edit more details of the product. ‘Attributes’ is where customers can select how they want their food to look and what they want to be inside.
For instance, if you sell pizza, you can edit the size of the pizza here, so customers get to choose if they want small, medium or large.
You can also put toppings, ingredients and many others as part of the attributes, so your customers get to select what they want to add to their food.
When you click on the ‘Add New Attribute’ option, you will be able to do this. You will also see options like ‘Multi-Select,’ ‘Optional,’ and ‘Active.’
Click multi-select if it is possible for customers to select more than one of that attribute.
Click optional if customers do not need to choose that attribute and ‘Active’ is set to show this attribute when customers are ordering. Click ‘Save’ to confirm.
Products
The ‘Products’ option is where you add the food items you have for say. You can create several products which will be displayed by your food ordering chatbot. Click ‘Add Product’ to add a food item.
A form will be displayed where you can edit the food details as well as a picture.
Price Variation
The price variation tab is in the middle of the page. This is where you set how the price varies depending on the attributes (which has been previously set) that your customers choose.
Fill in the details as you want. Take note of the ‘Increment/Decrement (with main price)’ tab. If it is set at ‘+’, it means any price you add in the ‘Amount’ tab in front of it will be added to the main price. It will be subtracted if it is set at ‘-‘
Edit the other details like product description, to describe the food, and a purchase note if you have one. Upload the food thumbnail and featured image. With featured image, you can add up to three images of the different pictures of the food.
Click ‘Save’ to confirm.
Delivery Points
The next option is ‘Delivery Points’. This option is to set pickup points when customers choose the ‘Pickup’ delivery option.
You can set as many points as possible. Click ‘Add Point’ to do this. If it is a restaurant where you accept reservations, customers can use this option to select a table.
Instead of the pickup option, you can use this tab to create the tables that are available in your restaurant, and customers can select their table, which will be reserved for them till they come.
When a table is taken, you can deselect the ‘Active’ option. Click ‘Save’ to confirm.
Coupon
As the name implies, as you can use this option to create a coupon. Click ‘Add Coupon’ and select the products that the coupon will apply to. If you do not select any product, the coupon is automatically applied to all products.
The coupon options include; ‘Percent,’ ‘Fixed Cart,’ and ‘Fixed product.’ For percent, you will edit the percentage of the price that will be deducted for this coupon (do this in the ‘Coupon Amount’ space).
Add the coupon code, expiry date, maximum usage limit, set if free shipping is applied and click ‘Save’ to confirm.
Order
Order tab is where you see all the food orders that have been placed by your customers. You can change the status of each order depending on if it has been attended to or not.
The invoice option opens up an invoice that can be printed in three different options. Click on the icon in front of each order under the ‘Invoice’ tab.
Copy URL
This is where you will find all the different URLs for your store. If anyone of them is clicked, it will take you to the corresponding page.
The Visit Store tab will take you to the store page. You can edit the order status notification that will be given to your customers in the ‘Order Status Notification.’
You can make the template for each place you want the notification to be sent; Messenger, SMS, and Email.
Steps to Create a Food Ordering Chatbot
To easily create a food ordering chatbot, here are the steps to follow:
Go to your restaurant’s e-commerce store on Zebrabuzz and select ‘Copy URL’ on the right side of your store page.
Now, navigate to the Messenger Bot, open it a new tab. Select the ‘Actions’ button under the ‘Bot Settings’ and the ‘Change Settings’ under the ‘Bot Reply Settings’
You can edit the reply settings here. Under the ‘Bot Name,’ input either ‘Breakfast,’ ‘Lunch,’ ‘Dinner’ or any other option like this that is available based on how your restaurant is run. Simply put, this is where you edit the food you offer based on each segment of your menu.
You can input the same words in the ‘Provide keywords’ box. Select ‘text with buttons’ in the ‘Select Reply Type’ box.
Also, edit the reply message to show instructions as to what the customer should do, e.g. ‘Please select an option below’.
The ‘Button Text’ is where you put the name of the food that is available, for instance, ‘Rice’ and select ‘Postback’ in the button type and click the add button.
A page will be displayed where you can edit the template. When people click on ‘Rice’, they have to select the type of rice they want. So the next page that opens is where you edit this.
Change the template name to the name of the type of rice available, e.g. ‘White Rice Template’ for white rice and ‘Fried Rice Template’ for fried rice.
Change the reply type to Generic Template; upload a picture of the food, edit the title of the food you are uploading, e.g. White Rice.
The sub-title can be the price of the food, and you can use ‘Order Now’ as the button text to prompt users to order the food. The ‘Button type’ will be set at ‘Webview [Full]’.
For the Web URL, remember you opened the COPY URL option in the previous tab, go back there and copy the product URL of the food you are creating this for. In this case, ‘White Rice’. Click the ‘Submit’ button to confirm.
You can add another button that will be linked to your product page. Therefore, you will copy the link to your product page from the COPY URL tab and paste it here.
You can add as many buttons as possible. These buttons you create will be the reply of your food ordering chatbot which customers will be able to choose.
When they click their choice of food and click ‘Order Now,’ the food page will be opened for them where they will be able to select additional attributes (which you must have created before) to be added to the food.
QR Menu
There are to QR Menus; Messenger QR Code and Outside QR Code.
With the Messenger QR code, customers can order food with their Facebook account while the outside QR code means customers can access your store from a browser.
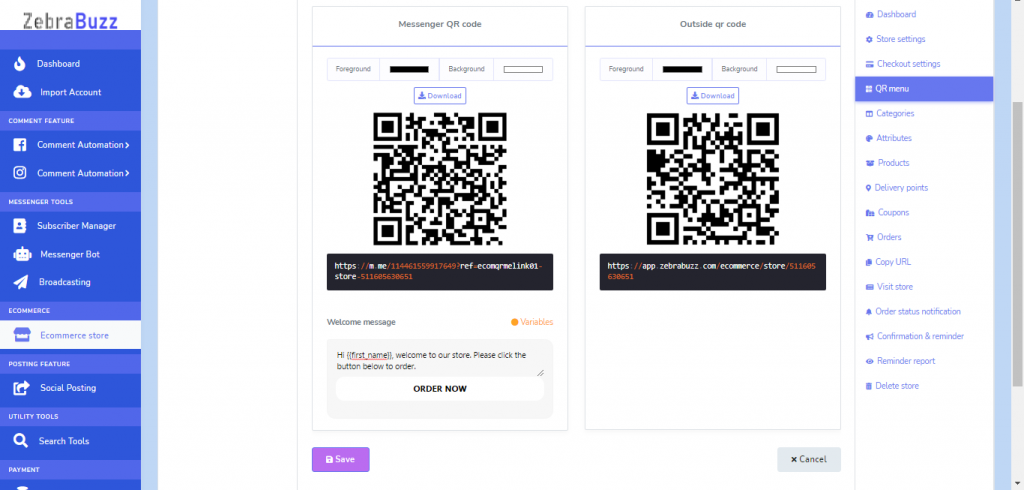
Let’s take the Messenger QR code, for example. Now, this is how it works:
You can download the QR code and use anyhow you want to. Use the box below it to instruct the customer that scans the code.
The instruction should direct the customer to take action on the button below, which could be ‘Order Now’. Click ‘Save’
You can test it with your smartphone camera to see how it works. Just scan the code directly on your screen, and you will get a message that directs you to go to the page. Open with Messenger.
When the page opens, and you click on the ‘Order Now’, you will be redirected to the product page of your restaurant. From here, customers will be able to make choices of food and add them to their cart as well as finally choosing their payment option.
Now for the Outside QR code:
Go through the same steps as above, but this time, when you scan, there will not be a Messenger option as a way of opening your store. You can only click on a browser.
It works the same way with the same interface. If the customer tries to add food to cart, it will prompt such customer to login into their Messenger.
After logging in, the customer can proceed to buy food. The steps work the same way just that it is not on Facebook Messenger.